Installation
Floor Levelling Before New Flooring: Costs, Process and When You Need It
 Roman Miller12 min read
Nobody gets excited about floor levelling. It's hidden under the new boards, it doesn't show up in the showroom, and it's the line on a quote that most people would quietly like to cross out. Yet it's one of the biggest reasons a new floor either feels solid for decades or starts clicking, bouncing and gapping within months.
We see it all the time when we measure up homes around Brisbane. A slab that looks perfectly fine to the eye turns out to dip 6mm near the kitchen bench. An old timber floor in a Queenslander rolls gently towards the back deck. A tiled floor has lipped edges that would telegraph straight through a new hybrid plank. None of these are disasters, but every one of them needs sorting out before the new floor goes down.
This guide explains floor levelling before new flooring in plain language: what it actually means, how flat your floor needs to be, how to check it yourself, what the levelling process involves, what it typically costs in Australia, and when you can safely skip it.
Quick answer
You need floor levelling when your subfloor has dips or humps beyond the flooring manufacturer's tolerance, which is commonly around 3mm under a 2m or 3m straight edge. Concrete slabs are usually corrected by grinding high spots and pouring self-levelling compound, which typically costs around $20 to $50 per square metre in Australia. Timber subfloors are fixed by sanding, packing or replacing joists, or adding a ply overlay. Skipping levelling can void warranties and cause gaps, bounce, squeaks and failed click joints.
Flat vs Level: The Difference That Matters
Before anything else, it helps to know that installers care more about flat than level, even though everyone calls the job "levelling".
- Level means horizontal. A floor that slopes evenly from one side of the house to the other isn't level, but it can still be perfectly flat.
- Flat means free of local dips, humps and ridges over a short distance. This is what flooring manufacturers measure and what your warranty depends on.
A gentle, even fall across a room rarely causes problems for most floor types. A 5mm hollow in the middle of a hallway does. So when we talk about "levelling", we usually mean making the surface flat within tolerance, not making it perfectly horizontal. Correcting a genuinely sloping house is a structural job, and we cover that separately below.
How Flat Does a Floor Need to Be?
Every flooring product has its own flatness tolerance, set out in the manufacturer's installation guide. The figures below are common examples from Australian installation guides, but your product's data sheet always takes priority.
| Floor type | Typical flatness requirement | Why it matters |
|---|---|---|
| Engineered timber (floating) | Around 3mm under a 2m or 3m straight edge | Hollows cause bounce and stress on joints |
| Engineered timber (direct stick) | Often tighter, around 2mm to 3mm over 3m | Glue needs full contact with the slab |
| Hybrid and SPC | Commonly 2mm to 3mm over 2m or 3m | Thin, rigid boards can crack click joints |
| Laminate | Commonly around 3mm over 2m | Movement over dips wears the locking system |
| Herringbone and parquetry | Usually tighter than straight planks | Small blocks show every high and low spot |
| Vinyl sheet and glue-down vinyl | Smooth as well as flat | Bumps and trowel marks show through the surface |
As a general rule, the thinner and more rigid the board, the more critical flatness becomes. Hybrid boards are a good example. They're tough on top, but the click joints can't flex much, so a dip underneath puts a lot of stress on a very small area.
The Australian Standard for resilient and hybrid floor coverings (AS 1884) and the guidance published by the Australasian Timber Flooring Association (ATFA) both stress a sound, dry, clean and flat subfloor. Installers follow those documents together with the specific manufacturer's guide.
Signs Your Floor Needs Levelling
You don't need a laser level to spot most problems. Look and feel for:
- Visible dips or humps when you crouch down and look across the floor towards a window.
- Rocking furniture that wobbles in one spot but sits firmly elsewhere.
- Gaps under skirting boards that change size along the wall.
- Lipped or uneven tiles if you plan to lay new flooring over existing tiles.
- Cracks or patched sections in a concrete slab, especially after renovations or old wall removals.
- Bouncy or spongy areas on a timber subfloor, often near doorways or old plumbing.
- Squeaks and creaks that suggest loose boards or failed fixings. Our guide on how to fix squeaky floorboards explains these in more detail.
- A previous floating floor that clicked, gapped or peaked, which is often a sign the subfloor underneath wasn't flat.
How to Check Your Floor at Home
A simple straight-edge test gives you a surprisingly good idea of what you're dealing with.
- Clear the room so you can see the full floor surface.
- Use a long straight edge, ideally 2m or 3m. A straight aluminium screed rail or a known-straight length of timber works well.
- Lay it across the floor in several directions: lengthways, across, and diagonally.
- Look for gaps under the edge, and slide a coin or a set of feeler gauges under the lowest point. A 20 cent coin is roughly 2.5mm thick, which makes a handy rough guide.
- Mark problem areas with tape or chalk, so you can show your installer exactly where the dips and humps are.
This won't replace a professional assessment, but it helps you understand your quote and ask better questions.
What Causes Uneven Floors?
Knowing the cause helps decide the right fix.
Concrete slabs
- Original finishing that was never perfectly flat, which is common in older homes.
- Removed walls, tiles or adhesives that leave ridges, hollows or rough patches.
- Shrinkage cracks and minor settlement over the years.
- Plumbing or electrical trenches that were back-filled and patched.
Timber subfloors
- Shrinking or twisted joists and bearers, common in older homes.
- Settled or deteriorating stumps, especially in raised Queenslanders.
- Cupped or worn floorboards from moisture or decades of foot traffic.
- Old repairs where boards or sheeting were replaced at a slightly different height.
The Floor Levelling Process, Step by Step
Which method suits your home comes down to the subfloor type and how far it sits outside tolerance. Here's how a typical job runs.
Step 1: Assess and measure
Your installer checks flatness with a straight edge or laser, tests moisture levels in the slab or timber, and looks for cracks, loose areas or contamination. This is also when they confirm what your chosen flooring requires.
Step 2: Remove old flooring and contaminants
Carpet, underlay, old tiles, vinyl and adhesive residue usually need to come up. Levelling compounds need a clean, sound surface to bond properly, so paint, dust, oil and loose material are removed.
Step 3: Grind high spots
On concrete, high spots and ridges are ground down with a diamond grinder. This often reduces how much compound is needed, because filling every low spot up to a hump wastes material.
Step 4: Prime the surface
A primer is applied so the levelling compound bonds properly and doesn't dry out too quickly. Skipping primer is one of the most common reasons compound later cracks or lifts.
Step 5: Fill or pour
- Small, shallow hollows are filled with a patching or feather-finish compound and trowelled smooth.
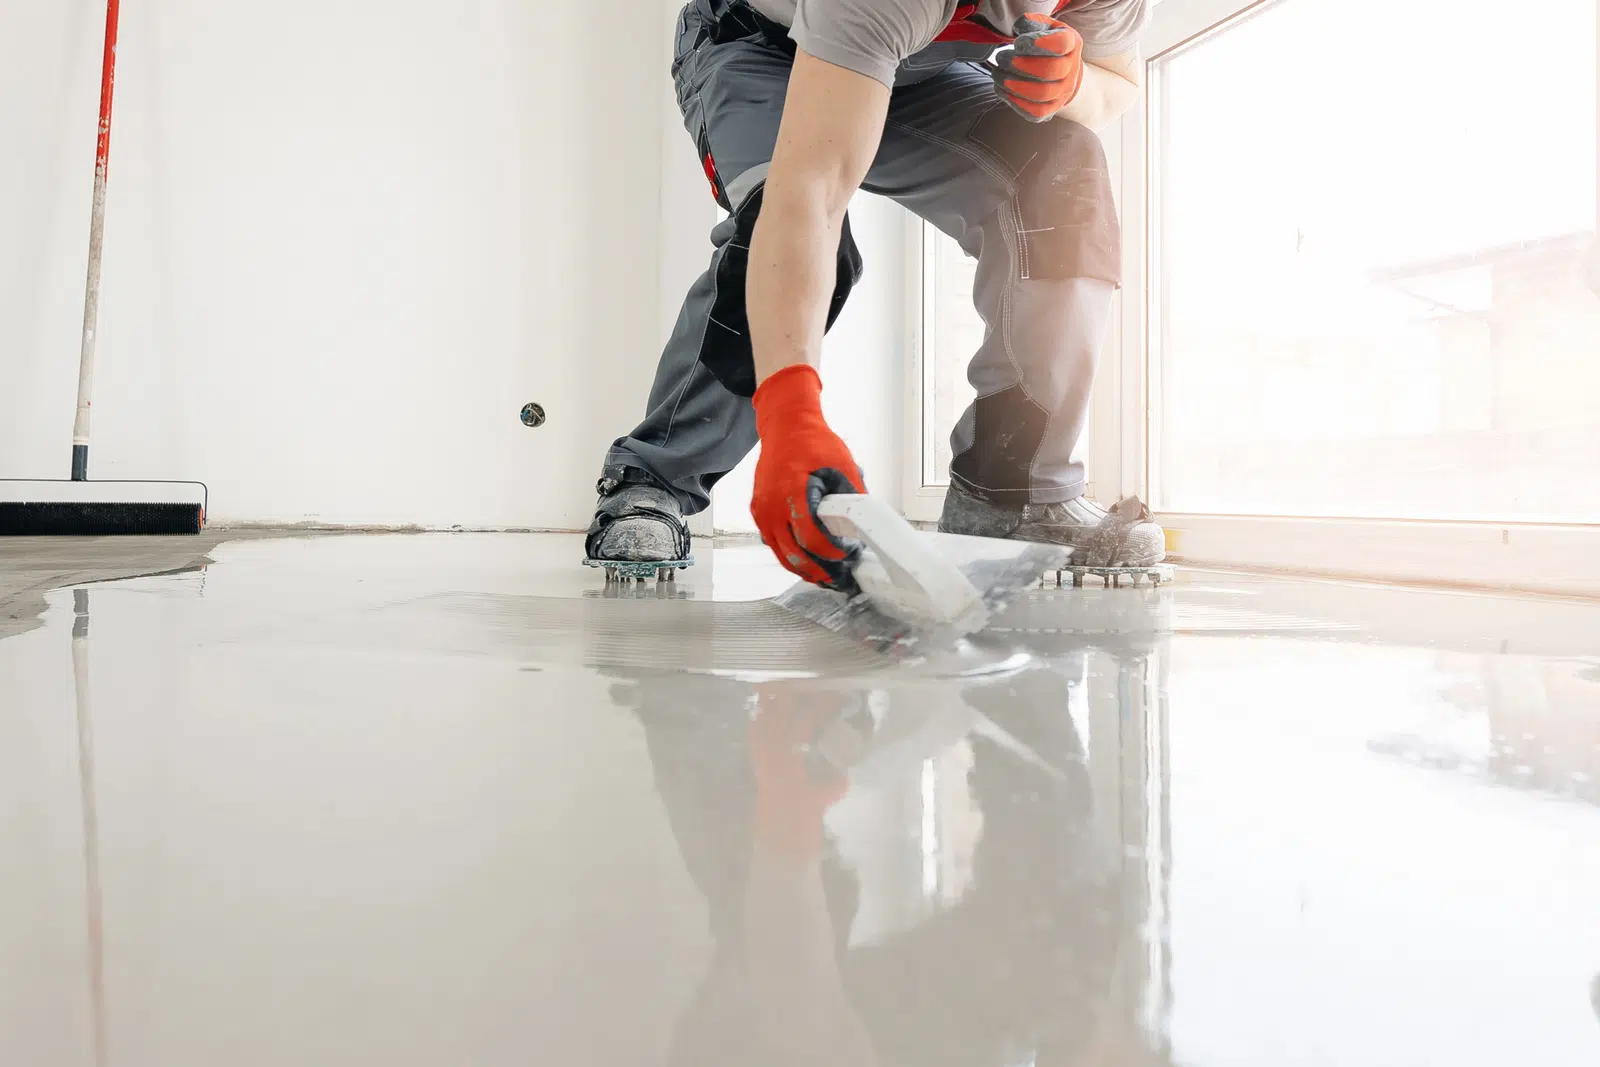
- Larger areas or whole rooms are levelled with a self-levelling compound. It's mixed to a pourable consistency, spread with a gauge rake and smoothed with a spiked roller to release air bubbles.
- Deep corrections may need a thicker sand and cement screed or a specialised deep-fill product.
Step 6: Cure and re‑check
The compound must cure before flooring goes down. Many products are walkable within hours, but the time before you can install flooring depends on the product, the thickness of the pour and the room conditions. Your installer follows the compound manufacturer's drying times, then re-checks flatness and moisture before laying the floor.
On timber subfloors
Timber subfloors are levelled differently, because most pourable compounds aren't suited to flexible timber:
- Re-fixing loose boards or sheets with screws.
- Sanding high spots on existing boards.
- Packing or planing joists to remove humps and hollows.
- Installing a ply overlay to create a new, flat surface over old boards.
- Restumping or re-levelling stumps where the whole house has dropped. This is structural work handled by a builder or restumping specialist.
Floor Levelling Costs in Australia
Floor levelling is almost always quoted per square metre, after the floor has been assessed. Because no two floors are the same, treat the figures below as a rough guide only.
| Type of work | Typical range | Notes |
|---|---|---|
| Self-levelling compound over a slab | Around $20 to $50 per m² | Most common for houses and apartments |
| Patching small hollows | Often priced per job or per bag | Cheaper when problems are isolated |
| Grinding high spots | Often added per m² or per hour | Depends on how many ridges need removing |
| Thicker sand and cement screed | Higher than standard compound | Used for deeper corrections |
| Ply overlay on a timber subfloor | Varies with ply thickness and area | Includes fixing and sanding joins |
| Restumping or structural re-levelling | Quoted separately by specialists | A building job, not flooring prep |
Industry guides put self-levelling compound over concrete slabs at roughly $20 to $50 per square metre across Australia, with some quotes higher for difficult sites, deep pours or small areas. A full specialist floor levelling service, including extensive grinding and preparation, can cost considerably more.
What pushes the price up?
- Depth of correction. Deeper dips mean more compound and sometimes multiple pours.
- Size of the area. Small rooms often cost more per square metre because setup time is the same.
- Removal of old flooring. Lifting tiles and grinding off adhesive add time.
- Moisture problems. A damp slab may need a moisture barrier before levelling or flooring.
- Access. Apartments with lift-only access or upstairs rooms add handling time.
The best approach is to ask for floor preparation to be listed separately on your quote, so you can see exactly what you're paying for.
When You Might Not Need Levelling
Levelling isn't always required. You may be able to skip it, or keep it minimal, when:
- Your floor already measures within the manufacturer's tolerance. Newer slabs often pass with only light grinding.
- The problem is a gentle, even slope rather than local dips and humps.
- You're choosing carpet, which is generally more forgiving of small irregularities.
- Only a few small spots need patching, rather than a whole room.
That said, it's rarely worth gambling. Fixing a subfloor after the new floor is down means lifting the floor, which costs far more than preparing it properly the first time.
What Happens If You Skip Levelling?
Laying new flooring over an uneven subfloor can lead to:
- Bounce and hollow sounds as boards flex over dips.
- Broken or separating click joints on hybrid, laminate and floating timber.
- Gaps and peaking along joins.
- Creaking and clicking underfoot.
- Poor adhesive contact on direct-stick floors, which can cause drummy or loose boards.
- Voided warranties, because most manufacturers make subfloor flatness a condition of cover.
That last point is important. If the subfloor is out of tolerance and a problem appears later, the manufacturer may decline the claim, leaving the homeowner to pay for repairs.
Floor Levelling in Brisbane Homes
Brisbane homes bring a few local challenges:
- Queenslanders and older timber homes often have settled stumps, worn boards and joists that have shrunk over time. Some need a ply overlay or stump work before a new floor can go down.
- Slab-on-ground homes in newer suburbs are usually closer to tolerance, but tile removal and renovations can leave ridges and hollows.
- Apartments often need levelling plus a body corporate approved underlay. You can read about sound ratings in our acoustic underlay guide.
- Humidity affects drying times for compounds and moisture readings in slabs, so good installers measure moisture rather than guessing.
If you're planning timber, hybrid or laminate, our installation pages explain what's involved for hardwood floor installation and hybrid floor installation.
What to Check Before You Sign a Quote
Before approving any quote, it's worth asking:
- Have you checked the floor for flatness and moisture? What were the readings?
- What tolerance does my chosen flooring require?
- Is levelling included, and is it listed as a separate line item?
- What method and compound will you use, and will the surface be primed?
- How long does the compound need to cure before installation?
- What happens to the warranty if the subfloor isn't prepared?
A good installer will answer these clearly and explain the reasons behind their recommendations.
Floor Levelling FAQs
How do I know if my floor needs levelling before new flooring?
Lay a long straight edge across the floor in several directions and check for gaps underneath. If gaps exceed your flooring manufacturer's tolerance, commonly around 3mm over 2m or 3m, the floor needs levelling. A professional assessment will confirm it.
How much does floor levelling cost in Australia?
Self-levelling compound over a concrete slab typically costs around $20 to $50 per square metre in Australia. Deeper corrections, grinding, small areas and difficult access can push the price higher.
Can I install hybrid flooring on an uneven floor?
Not if the unevenness exceeds the manufacturer's tolerance. Hybrid boards are rigid, so dips and humps stress the click joints, which can cause gapping, clicking or broken joints and may void the warranty.
How long does self‑levelling compound take to dry?
Many compounds can be walked on within a few hours, but the time before flooring can be installed depends on the product, the thickness of the pour and the room conditions. Always follow the compound manufacturer's drying times.
Can you level a timber subfloor?
Yes, but it's done differently from concrete. Installers usually re-fix loose boards, sand high spots, pack or plane joists, or lay a ply overlay. Whole-house settlement needs restumping by a specialist.
Is floor levelling the same as restumping?
No. Floor levelling corrects the surface your new floor sits on. Restumping corrects the structure of a raised house by replacing or adjusting stumps. Some older Brisbane homes need both.
Does floor levelling affect my flooring warranty?
Often, yes. Most flooring manufacturers require the subfloor to meet their flatness tolerance, so an unprepared subfloor can void the warranty if problems appear later.
Can I level my floor myself?
Small patches can be a DIY job, but pouring self-levelling compound across a room needs the right primer, mixing, timing and tools. Mistakes can leave ridges that are harder to fix than the original floor, so most homeowners leave it to professionals.
Getting the Foundation Right
Floor levelling isn't the exciting part of a renovation, but it's the part that decides how your new floor feels and how long it lasts. The boards you choose get all the attention in the showroom, yet it's the surface underneath that stops them bouncing, clicking, gapping or failing early. A few hundred dollars spent on preparation can protect an investment worth many thousands, and it keeps your warranty intact.
The good news is that most uneven floors are straightforward to fix once they're properly assessed. Some only need a few high spots ground back and a little patching. Others need a full pour of self-levelling compound or a ply overlay on an older timber floor. What matters is that the work matches your subfloor, your chosen flooring and the manufacturer's requirements, rather than being guessed at or skipped to make a quote look cheaper.
At LKV Flooring, we check every floor before we install, from flatness and moisture readings to the condition of the slab or timber underneath. We'll explain what we find in plain language, show you what your chosen floor needs, and list any preparation clearly on your quote so there are no surprises. Our in-house team then prepares the subfloor properly and installs your timber, hybrid or laminate floor so it looks and feels right for years to come.
If you're planning new flooring and aren't sure what's underneath, come and see us at our Newstead showroom, call (07) 3890 5173, or book a measure and quote. We'll take a proper look at your floor and give you honest advice on exactly what it needs.